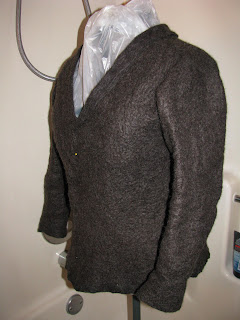
I thought I would share the story of its development here.
I like incorporating silk gauze into the felt for added strength and drapability. So the first thing was to dye 4 yards of silk gauze black so it would blend in with my natural colored Bluefaced Leicester fiber. I had Zeilingers woolen mill in Frankenmuth process my BFL fiber into 2 pound batts 45" wide x 80" long. So all I have to do is peel off a layer and place it on the silk. The silk gauze is on a sheet of plastic with bubble wrap underneath - all the layout is done on my kitchen counter. The bubble wrap is actually a sturdy pool cover - 40" wide and 8 feet long. I put another thin layer of fiber perpendicular to the first layer.
 |
| This is actually a vest layout, I didn't cut the front center until after the prefelt was dry for the jacket. But it was the same layout process as used for the jacket. |
 |
| This is the rolling machine, but not the jacket fabric being rolled. Picture the roll completely filling the width of the rolling machine to get a better idea. Next time I should take photos as I go! |
The next morning the pre-felt fabric is dry and I cut out my pieces. This is just a matter of folding over the long piece and cutting up the center of one half and making a neck hole in the center. The sleeve piece is folded lengthwise, cut in half and a triangle is cut from each end. The sleeves are basted to each side of the body rectangle and the side seams are basted. A collar is cut from the triangles and basted along the neck edge. Here is how it looks at that stage.
Then the fun starts, I put the jacket in warm/hot soapy water and start tossing and squeezing it. I work areas where I want more shrinkage to occur. The worst part of this process is trying to squeeze out excess water so I can try it on. I get soaking wet during the fitting process.
With felt, you can simply cut away parts you don't want. So it's easy to clean up edges and redesign your stupid looking collar after the fact. I decided to make this one into a shawl collar.
Then I cover my dress form with a garbage bag and put it in the bathtub to drip dry. It's hard to leave it alone until it's dry the next morning. I've ordered a spin dryer which will help get it damp dry in just minutes. I can't wait until it arrives! My hands get sore with all the wringing and manipulation of the fiber in hot and then cold water. But it's really fun to make these jackets. During the fulling process the felt reminds me of clay because you can shape it. I purposely made this jacket more subtle than the last one I made. I didn't add any embelishing fibers to the surface. But if the mood strikes, I can always needle felt on some colors and wet it down and shape in the waist a bit more.


You are amazing Becky...such talent.
ReplyDeleteI'm inspired Becky. I've only tried vests so far. And I've been just getting the giant batts that cover a king size bed - had no idea I could order 2 lb. batts - will definitely try that next time. Thanks for sharing.
ReplyDeleteJudy, I was so inspired after seeing all the beautiful garments at the Midwest Felting symposium last summer I was determined to give it a try. I ordered Lizzie Houghton's book, "Felting Fashion". She gives lots of ideas on how to make hats,jackets and coats. One piece or basted like this one. The batts really make laying it out easier. But I need a bigger layout area and a better system of wetting things down. I'm always dripping off the counter top.
ReplyDeleteThanks Kelly, but I don't think it's talent as much as it is a willingness to give things a try. Wool is amazing stuff!
ReplyDeleteI love your work Becky. Great job!
ReplyDeleteWow. You do amazing felt work!
ReplyDeleteBeautiful jacket! I enjoyed the photos. I really wasn't sure how the felt roller machine worked - now I have a better idea. My hands could never take all the water and soap. I just heard about a countertop spinner on a podcast. It's supposed to work very well. I can't wait to hear about it!
ReplyDeleteThanks ladies! I ordered a Laundry Alternative spinner but it's on back order until February, so I'll just have to get by until then. I got to try one at the Midwest Felting Symposium in 2009 and they really are efficient at getting things almost completely dry!
ReplyDeleteThis is a fantastic post, Becky. Thanks so much for sharing the steps with us. I love the finished product!
ReplyDelete